Google
The following instructions describe how to configure OAuth2 using Google.
Step 1: Register OAuth2 Provider in MergeBoard
To start the process of adding a new provider, click on the Add OAuth2 Provider button in MergeBoard.

Form to add a new OAuth2 provider.
Select the provider type Google from the list and enter a provider name
(will be displayed to users in the login dialog). To proceed click on Next.
Step 2: Register OAuth2 Provider in Google
Go to console.developers.google.com/apis/credentials.
Select or Create Project
In the title bar, select the Google Cloud Platform project that you want the OAuth configuration to be associated with. If no project exists yet, you will see the following message. In this case, create a new project by clicking on Create Project and filling out the form.

Information message shown when there aren’t any Google Cloud Platform projects yet.
Configure OAuth Consent Screen
Before you can add credentials, you may need to configure the OAuth consent screen. In this case, click on Configure Consent Screen.

Warning shown when no OAuth consent screen has been configured yet.
In the following dialog, fill in the fields as follows.
- User Type
Generally, only the users in your organization should have access to MergeBoard. Therefore, select Internal.
Click on Next.

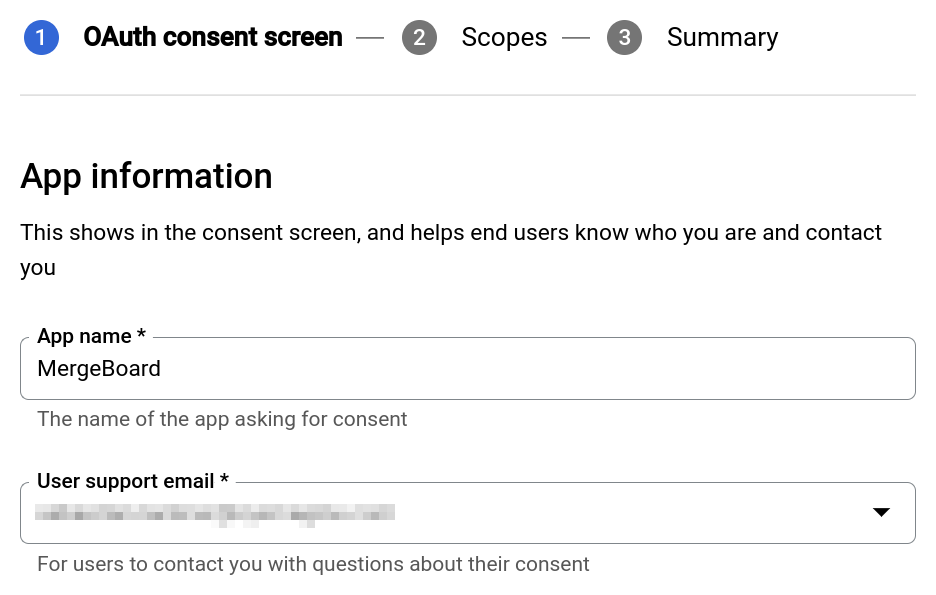
Dialog to edit OAuth consent screen.
- App name
The name of the application can be chosen freely. It will be displayed to users when they log in.
- User support email
Select the email address here that users can contact if they have any questions regarding the login process.
- Authorized domains
Can be left empty for now, as Google will automatically add the URL once you create the credentials.
- Developer contact information
One or multiple email addresses that Google will use to notify you if something changes regarding your OAuth integration.
All other fields can be extended with further details about the MergeBoard instance if desired, or you can leave them empty. Click on Save and Continue to proceed to the next page.
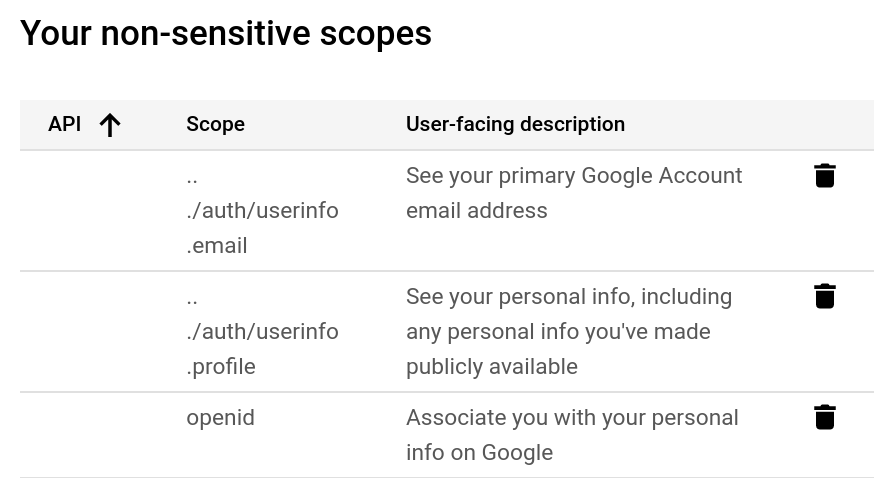
The next step is to select which permission MergeBoard should have. Click on Add or Remove Scopes and select the following scopes, then click on Update.
.../auth/userinfo.email.../auth/userinfo.profileopenid

List of scopes needed by MergeBoard.
Click on Save and Continue, double-check if the entered data is correct, and then on Back to Dashboard.
Generate Client ID and Secret
To proceed with the setup, select Credentials in the sidebar, and then click Create Credentials at the top. Select OAuth client ID from the dropdown menu. Fill out the form as follows.
- Application type
Select Web application.
- Name
The name of the application can be chosen arbitrarily, and will not be shown to end users.
- Authorized redirect URIs
Click on Add URI and enter the Redirect URL as generated by MergeBoard after completing the first form of the OAuth2 provider creation.
When you are done click on Create. If everything went successful a popup will open showing the generated Client ID and Client Secret. Save both values, as they will be needed to finish the configuration in MergeBoard.
Configuration changed need some time to take effect
Note Google’s warning that it can take anywhere from 5 minutes to several hours for the changes to actually take effect. Please be patient if the login via MergeBoard does not work immediately.
Step 3: Complete Configuration in MergeBoard
Back in MergeBoard, fill out the form as follows.
- Enable Provider
Enable the checkbox to allow users to login via this provider.
- Client ID
Enter the Client ID as shown by Google.
- Client Secret
Enter the Client Secret as shown by Google.
Once you are happy with the settings click on Save.